Showing posts with label tutorial. Show all posts

Tuesday, March 22, 2011

Baking Cup Flowers

YAY!  It's officially spring!  Okay, I woke up to a blanket of snow covering the ground, but that's Idaho for you!

But there's nothing like longing for a little spring color, warmth, and cheeriness to inspire a flower project, right?

YOU WILL NEED:  *Baking cups in pretty colors (the regular and "mini" sizes)
*Pop-sickle/craft sticks
*Beads 
*Fishing line
*Needle (with a big enough eye for the fishing line)
*Scissors
*Glue (glue stick and all-purpose craft glue)
OPTIONAL: Small clay flower pots and floral foam

You'll want to use the pretty colored side of the baking cups, so you'll have to...


Flatten them out!


Cut triangles in one of the baking cups


All the way around.


Glue Stick time!  Just in the center.


Layer the baking cup with cut-out triangles on top


Glue a small size baking cup to the center


Thread a length of fishing line up from the bottom of your flower and through a bead (If you are careful, then the paper will not rip)


Sew back down through the cups to finish attaching the bead.


Add a dab of craft glue to the back of your flower and attach a pop-sickle stick.  


Secure the fishing line to the pop-sickle stick with a double knot, and another dab of glue.
Trim the fishing line. 

TAH-DAH!!  Flower!   If you would like, you can display your flower in a small terra-cotta pot.  Just cut a little square of floral foam, smoosh it down in the pot, and push the pop-sickle stick into the foam. 

Random Giraffe approves!

So does the dinosaur!  


Wednesday, January 12, 2011

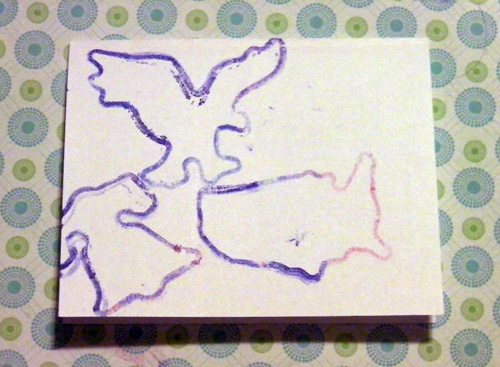
Silly Bandz Prints

If you have kids or spend a lot of time with kids, you are probably aware of the phenomenon that is "Silly Bandz"  That is, shaped rubber bands.  They come in many shapes and a lot of kids like to wear a big stack of them around their wrist.  Here's a little project using them to make prints!


Supplies:  Shaped rubber bands, ink pads, paper


On a scrap piece of paper, cover one side of the bands in ink by tapping the ink pads on them.  You can use one color, or use several different pads to color the band for a multi-color effect.


On the paper you are making the print on, carefully lay the bands on the paper, ink side down.  Tap them gently on the paper, trying to keep them in one place as much as possible.


Pull the rubber bands up carefully.   You can rinse the ink off of the bands in cool water. 


Now you can use the ink pads and colored pencils to color your print!


Friday, December 31, 2010

Interchangeable Ribbon Wands

A fun little project for New Year's Eve!  Interchangeable Ribbon Wands.  You can make several different streamers and change them out to fit your mood. 

MATERIALS:  Wooden Dowels, Paint, Eye Hooks, Lanyard Hooks, Various Ribbon
TOOLS: Scissors, Hand Drill or Rotary Tool

Paint the wooden dowel.  Drill a small pilot hole in the end of the dowel with either a hand drill or rotary tool.  Screw in an eye hook. 


Cut 2 lengths of ribbon for every streamer you want to make.  I used 2 yards (6 feet) for these, but you can shorten or lengthen them as desired.  You can put a little fray check on the ends to prevent fraying.


Fold the 2 lengths of ribbon in half and thread them through the lanyard hook.  Tie a knot to secure them to the hook.  Tie several half knots with the ribbon if desired.  (Click on MACRAME BASICS at the top of the page for instructions)


Clip the streamer of your choice onto the eye hook.   


Tah Dah!  You now have a ribbon wand that you can change the streamers on!

HAPPY NEW YEAR!!!


Wednesday, August 11, 2010

Wooden Spool Beads


A long, long time ago (well in Internet terms, anyway) I had a tutorial up for these beads.  I'm putting together a "quickie" tutorial for them here.  This pre-supposes a basic knowledge of working with polymer clay, for which there is a LOT of information on the internet, so without further ado:


Supplies!
You'll Need:
Polymer clay, a roller or pasta machine, cutting blade (a wall paper scraping blade works well for larger cuts, a craft knife is handing for finer trimming,) wooden spools, and acrylic paint


Paint your wooden spools with the acrylic paint.


This is my oh-so-fancy palette.  Ahem. 


Condition your clay, roll it out into sheets, and decorate it (Stamping, swirled colors, canework, etc.) however you choose.   I rolled it out on the third thickest setting on my pasta machine.  The top one is colors swirled together, the second one is covered with canes, and the third one is stamped.  Trim the clay with your blade so it will fit in the middle of the spool.  


Wrap the clay around the spool, and trim it so the edges meet.  You can smooth the seam if it's canework or swirled colors, you'll want to avoid pressing and fussing too much if it's stamped or textured.   You might need to trim a little clay off at the top or bottom.   Bake according to the manufacturer's directions.  


All Done!