Showing posts with label hearts. Show all posts

Thursday, February 10, 2011

Polymer Clay Bugs Tutorial: Butterflies!

Butterflies! 
For the last in the series on making making polymer clay bugs with heart shaped cookie cutters: butterflies!

SUPPLIES and TOOLS: *Heart shaped cookie cutter (I used the smaller one for these butterflies)  *Polymer clay in black and red (or whatever colors you would like your butterflies to be)  *Needle tool  *Rolling tool (pasta machine, acrylic roller, rolling pin, fondant roller)  *work surface and oven


Roll out the clay to the thickest setting on the pasta machine, or about 1/8" thick.  Cut out hearts with the heart shaped cutter.  Cut out four hearts for two butterflies. 


Place the corner of one heart over the corner of the other heart and gently press down to adhere the clay together. 


Gently smooth the seam with a roller (I used the end of a paintbrush)


Roll a small snake of the opposite color and press it down onto the middle of the hearts  for the body.


Use a needle tool to incise a line in the middle of each heart for wings.


Roll out small balls of the opposite color and press them down on the wings. 


Use a needle tool to gently press segments into the body.


Bake according to the clay manufacturer's directions! 

Now you can add magnets, pin backs, or hair clips to your ladybugs and butterflies!


Tuesday, February 8, 2011

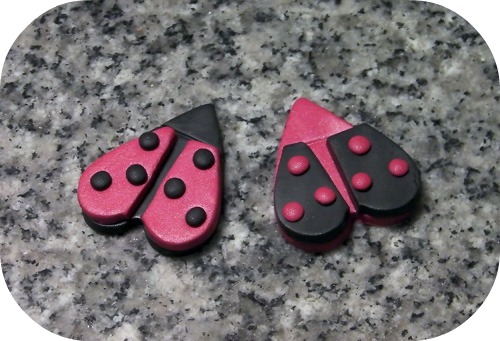
Making Polymer Clay Bugs Tutorial: Ladybugs Version 2

As promised, another version of the heart ladybugs!


SUPPLIES: *Polymer clay in black and red  *Heart shaped cookie cutters  *Needle Tool  *Blade to cut clay with (X-acto knife, wall paper craping blade, tissue blade, polymer clay blade, etc)  *Something to roll clay out with (Pasta machine, rolling pin, acrylic roller, fondant roller, etc.) *Work surface and an oven to bake clay in.  


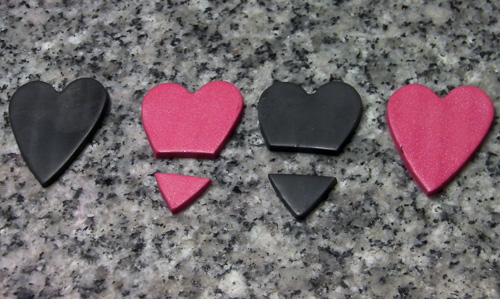
Roll out clay to the thickest setting on the pasta machine or about 1/8" thick.   Use the heart cookie cutter to cut out heart shapes.  You will need one heart of each color for one bug, it is just as easy to cut out four hearts and make two different bugs.  


Cut off the bottom corner of two of the hearts


This one is easier to show than to explain!  Cut a thin triangle out of the top part of the heart.  The two parts that are left will be the wings. 


Place the wings on the opposite colored heart and press down to secure them. 


Roll out small balls of the opposite color and place them on the wings, pushing them down with your fingers to secure them.  Bake your ladybugs according to the clay manufacturer's instructions.  

Sunday, February 6, 2011

Ladybugs, ladybugs! Making ladybugs with heart shaped cookie cutters

Ladybugs!
Valentine's Day is just around the corner!  Instead of the usual Valentines, this week I'm going to share how to make some cute polymer clay bugs with heart shaped cookie cutters.  They can be made into magnets, pins, hair clips, or as a part of a bigger project.  (They would be very cute glued to a picture frame, for example!)  We'll start off with some shiny metallic ladybugs!

Supplies!
You will need: *Polymer Clay (just black will be enough for this version of the project)  *Mica Powder (I used Pearl-Ex brand in Super Russet)  *Heart shaped cookie cutters  *Needle Tool  *Small paintbrush

A surface to work on (I use a marble tile I got at the hardware store for about 5 bucks) Something to roll out the clay with (I have a pasta machine that works well and makes it easy, but you can also use a rolling pin, acrylic roller, or fondant roller)  And an oven to bake the clay in.


Condition and roll out your clay.  I used the thickest setting on my pasta machine, or about 1/8" thick.   Cut out a heart shape with your cookie cutter. 


Use your needle tool to incise a line across the bottom corner of the heart, and two lines down the middle.  These now become the head and the wings of the ladybug.


Use a small, soft paintbrush to brush your mica powder onto the wings.  


Using the needle tool, push into the clay to create spots.  (Just poke far enough to create the appearance of spots, do not poke the needle tool all the way through the clay.) 

Bake the ladybugs according to the clay manufacturer's directions.  Brush on a clay compatible glaze if desired or if you are going to use them for something that will receive a lot of handling.  I will often use liquid polymer clay (which will require another baking) or water-based Varathane by Rust-o-leum.

Now you can glue on a magnet, pin back, or hair clip, or use them in some other wonderful project you dream up!

Click HERE for a different version of the ladybugs!