I have moved to my own domain name!
Head to: MakeMesses.com for more projects, tutorials, and fun!

Saturday, December 31, 2011
Tuesday, March 22, 2011
Baking Cup Flowers
YAY! It's officially spring! Okay, I woke up to a blanket of snow covering the ground, but that's Idaho for you!
But there's nothing like longing for a little spring color, warmth, and cheeriness to inspire a flower project, right?


But there's nothing like longing for a little spring color, warmth, and cheeriness to inspire a flower project, right?


YOU WILL NEED: *Baking cups in pretty colors (the regular and "mini" sizes)
*Pop-sickle/craft sticks
*Beads
*Fishing line
*Needle (with a big enough eye for the fishing line)
*Scissors
*Glue (glue stick and all-purpose craft glue)
OPTIONAL: Small clay flower pots and floral foam

You'll want to use the pretty colored side of the baking cups, so you'll have to...

Flatten them out!

Cut triangles in one of the baking cups

All the way around.

Glue Stick time! Just in the center.

Layer the baking cup with cut-out triangles on top

Glue a small size baking cup to the center

Thread a length of fishing line up from the bottom of your flower and through a bead (If you are careful, then the paper will not rip)

Sew back down through the cups to finish attaching the bead.

Add a dab of craft glue to the back of your flower and attach a pop-sickle stick.

Secure the fishing line to the pop-sickle stick with a double knot, and another dab of glue.
Trim the fishing line.

TAH-DAH!! Flower! If you would like, you can display your flower in a small terra-cotta pot. Just cut a little square of floral foam, smoosh it down in the pot, and push the pop-sickle stick into the foam.

Random Giraffe approves!

So does the dinosaur!
Saturday, March 12, 2011
Shamrock Garland
I'm a St. Patty's Day baby, so I rather enjoy decking the entire house in green and shamrocks!


This was a super-simple little garland to make

You will need craft foam shamrock shapes, embroidery floss or craft thread, and a needle.

Thread the needle and take a small stitch in each of the shamrock shapes, spreading them evenly along the thread.

Continue until the garland is as long as you would like it to be
Hang your garland up!
Tuesday, February 15, 2011
How to Make a Simple Felt Finger Puppet
 |
| Hello! I'm a friendly monster finger puppet! |
YOU WILL NEED: *A sheet of craft felt (in your favorite color!) *A contrasting color of embroidery floss or craft thread *Needle *Scissors *Marker *Glue *Googly Eye (or eyeS. You only have to make a cyclops if you want to. )


Fold one end of the sheet of felt down slightly shorter than the length of your finger. (This was about 2 1/2 inches for me) Place your finger on the felt and draw lines with the marker approximately 1/2 inch away from your finger on either side.

Pin the two sides of the felt together.

Cut out the piece of felt down each side and along the bottom, leaving the top connected

You should now have a piece of felt that looks like this.

Fold the felt in half. Cut a length of embroidery floss or craft thread. Tie a knot in the end. Bring the needle up from what will become the inside of your finger puppet so the knot will be hidden inside.

Sew up one side of the puppet. I used the split stitch, it's very simple - Down through the fabric and then back up halfway through the stitch you just made. HERE is a good tutorial for it along with several other embroidery stitches.

When you get to the top, simply loop the thread around and around and around the top all the way across. You can vary the length of stitches to give it the look of fur or hair.

Continue all the way across

Sew back down the other side, knot the end and trim the thread.

Now stitch a cute smiling mouth! This is simply two long stitches, slightly overlapped at the bottom corner. Be careful to only stitch on one side of your puppet so you don't accidentally stitch one side to the other where your finger is supposed to go.

Glue on a googly eye! Or two googly eyes! It's your puppet, you decide!
|
| Pretty cute, huh? Now go make your own and put on a puppet show! |
Thursday, February 10, 2011
Polymer Clay Bugs Tutorial: Butterflies!
 |
| Butterflies! |

SUPPLIES and TOOLS: *Heart shaped cookie cutter (I used the smaller one for these butterflies) *Polymer clay in black and red (or whatever colors you would like your butterflies to be) *Needle tool *Rolling tool (pasta machine, acrylic roller, rolling pin, fondant roller) *work surface and oven

Roll out the clay to the thickest setting on the pasta machine, or about 1/8" thick. Cut out hearts with the heart shaped cutter. Cut out four hearts for two butterflies.

Place the corner of one heart over the corner of the other heart and gently press down to adhere the clay together.

Gently smooth the seam with a roller (I used the end of a paintbrush)

Roll a small snake of the opposite color and press it down onto the middle of the hearts for the body.

Use a needle tool to incise a line in the middle of each heart for wings.

Roll out small balls of the opposite color and press them down on the wings.

Use a needle tool to gently press segments into the body.

Bake according to the clay manufacturer's directions!

Now you can add magnets, pin backs, or hair clips to your ladybugs and butterflies!
Tuesday, February 8, 2011
Making Polymer Clay Bugs Tutorial: Ladybugs Version 2
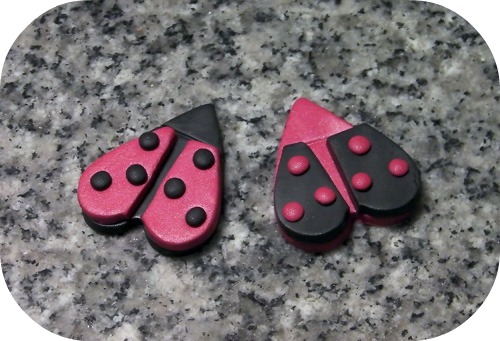
As promised, another version of the heart ladybugs!
|
SUPPLIES: *Polymer clay in black and red *Heart shaped cookie cutters *Needle Tool *Blade to cut clay with (X-acto knife, wall paper craping blade, tissue blade, polymer clay blade, etc) *Something to roll clay out with (Pasta machine, rolling pin, acrylic roller, fondant roller, etc.) *Work surface and an oven to bake clay in. |

Roll out clay to the thickest setting on the pasta machine or about 1/8" thick. Use the heart cookie cutter to cut out heart shapes. You will need one heart of each color for one bug, it is just as easy to cut out four hearts and make two different bugs.
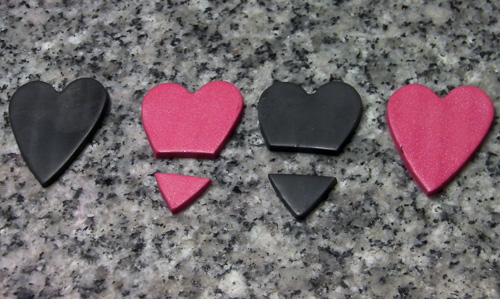
Cut off the bottom corner of two of the hearts

This one is easier to show than to explain! Cut a thin triangle out of the top part of the heart. The two parts that are left will be the wings.

Place the wings on the opposite colored heart and press down to secure them.

Roll out small balls of the opposite color and place them on the wings, pushing them down with your fingers to secure them. Bake your ladybugs according to the clay manufacturer's instructions.
Subscribe to:
Comments (Atom)